In this tutorial, you will resize the uploaded photo, constraining aspect ratio.

Setup
As I mentioned, you always can jump into any topic in this series. The setup instructions are at README.
Once your setup is done, let’s get it started.
File size
File size is the real issue in high performing web application. Large file size requires a longer time to download in user’s browser. It gives the user a bad experience.
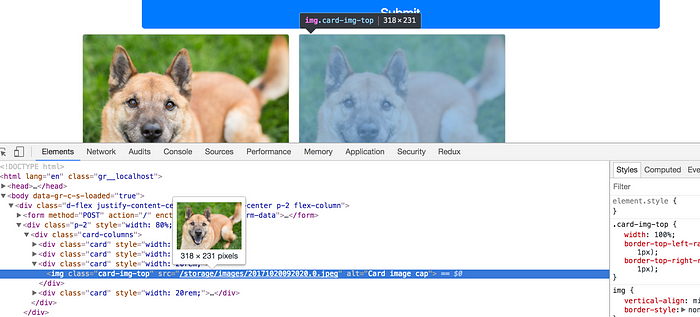
By using Chrome’s developer tool, you can inspect the photo’s original dimension and display dimension.

As you can see, the uploaded photo is displaying in a smaller dimension, means the photo is wasting the download bandwidth.
You need to fix it.
Intervention Image
Intervention Image is an open source PHP library. It provides an easy way to create thumbnails, watermarks, or format image file, or resize an image.
Firstly, you install the package via composer.
// Terminal
composer require intervention/image
Add the service provider in application’s config.
// config/app.php
'providers' => [
    ...

    /*
     * Package Service Providers...
     */
    Intervention\Image\ImageServiceProvider::class,

    ...

],

...

'aliases' => [
    ...
    'Image' => Intervention\Image\Facades\Image::class,
    ...

],
Then, publish the config file.
// Terminal
php artisan vendor:publish --provider="Intervention\Image\ImageServiceProviderLaravel5"
Copied File [/vendor/intervention/image/src/config/config.php] To [/config/image.php]
Publishing complete.
Next, you resize the photo in the controller.
Resize the photo
In Intervention Image library, it has resize, widen, and heighten APIs to do the job. Each of them performs a specific task.
resize resizes the image to the new width and/or height. widen resizes the image to the new width, constraining aspect ratio. heighten resizes the image to the new height, constraining aspect ratio.
As per our finding, the photo is displaying on a fixed width, 318px. You are going to make sure each uploaded photo is fitting according to the width. In this case, you use widen.
// app/Http/Controllers/PhotoController.php
use Illuminate\Support\Facades\Storage;
use Intervention\Image\Facades\Image;

class PhotoController extends Controller
{
    ...

    public function store(UploadPhotoRequest $request)
    {
        $dt = now();
        foreach ($request->file('photo.*') as $key => $file) {
            $extension = $file->extension();

            $path = 'public/images/' . implode('.', [
                    $dt->format('YmdHis'),
                    $key,
                    $extension
                ]);

            $image = Image::make($file);
            $image->widen(318);

            Storage::put($path, (string) $image->encode());

            $photo = new Photo();
            $photo->path = $path;
            $photo->save();
        }

        return view('success');
    }

    ...
}
Do you realise the resized photo has to encode and cast to string before creating via Storage facade?
It is a workaround to keep Laravel’s built-in functionality while using Intervention for image processing.
Now, you upload the same photo again and check on the display size.
The photo is resized to the expected dimension.

And, the file size is smaller than the original file size. You successfully save the bandwidth by resizing the photo to the right size.
GD extension is missing
If you hit the error below,
the requested PHP extension gd is missing from your system.Check out Installing the GD Library for PHP.
If you’re using Docker, add these lines in your Dockerfile and rebuild the image.
// Dockerfile
RUN apt-get update && \
    apt-get install -y libfreetype6-dev libjpeg62-turbo-dev && \
    docker-php-ext-configure gd --with-freetype-dir=/usr/include/ --with-jpeg-dir=/usr/include/  &&  \
    docker-php-ext-install gd
What’s next
Next tutorial will be talking about saving to the cloud.
If you haven’t subscribed to my email list on the homepage, do it now. I’ll notify you when the new tutorial is published.
Did I tell you that you’ll receive a series of FREE tutorials when you subscribe? Go check it out.
Stay tuned.
Originally published at I Teach You How To Code.