In this tutorial, you will validate the uploaded file.
Check out from Github
Clone the project
Project link: https://github.com/co0lsky/photo-management-with-laravel
Clone the project from Github
// Terminal
git clone -b '#1_file_upload' https://github.com/co0lsky/photo-management-with-laravel.git photo-management
cd photo-management
composer install
Configure application environment file
Duplicate the .env.example to be .env
Generate Application Key
Next, you should generate an application key. The application key helps to secure your application’s user sessions and other encrypted data.
// Terminal
php artisan key:generate
Application key [base64:uJwG9Kge1xwH7O0/sckwN96pENJJy8cr5i+WbwQ7dYw=] set successfully.
Test
Launch your application.

Form Request Validation
In Laravel, the validation logic is placed in the Request, not in the Controller. This separates the concern from the Controller as fulfilling the Single responsibility principle and Open closed principle. Rather than repeating the if-else validation codes, developers can focus on the business logic.
This is Laravel’s validation code.
$request->validate([
        'title' => 'required|unique:posts|max:255',
    ]);
And, my favorite is the custom request class that contains the validation logic. It saves few lines of code within the Controller and makes the request reusable.
Create a custom request
Create a new request class.
// Terminal
php artisan make:request UploadPhotoRequest
Request created successfully.
The authorize method controls the user access on using this request class. For now, you have no authorization feature. So, just return true.
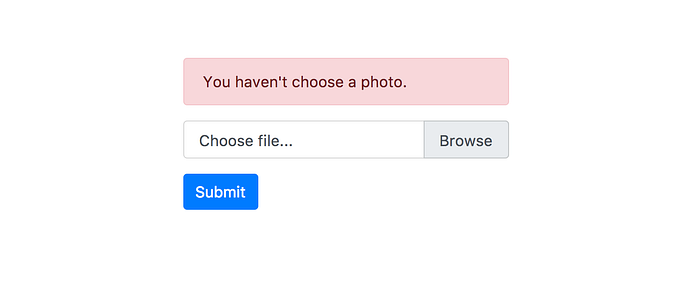
The rules method holds the validation rules. You validate the photo field. It is a compulsory input and only allows image type file.
// app/Http/Requests/UploadPhotoRequest.php
public function authorize()
{
    return true;
}

...
public function rules()
{
    return [
        'photo' => 'required|image'
    ];
}
Then, you type-hint the UploadPhotoRequest on store method in PhotoController.
// app/Http/Controllers/PhotoController.php
public function store(UploadPhotoRequest $request)
{
    ...
}
Now, you can test it by uploading a non-image file. The uploaded file will not store in the storage.
Display error
To provide a good user experience to your user, display an error message to tell the user the supported file types.
You display the error message above the file input.
// resources/views/index.blade.php
<form method="POST" action="/" enctype="multipart/form-data">
    {{ csrf_field() }}
    @if ($errors->has('photo'))
        <div class="alert alert-danger" role="alert">
            {{ $errors->first('photo') }}
        </div>
    @endif
    ...
</form>
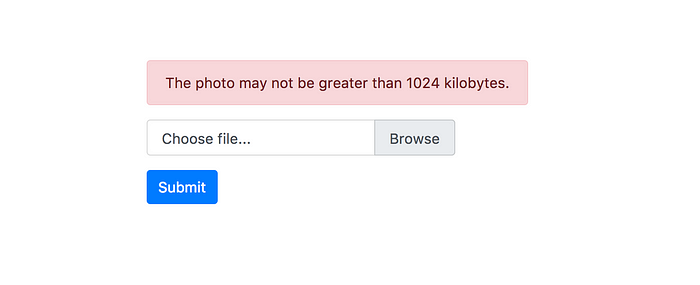
Limit file size
Limit the photo size that user can upload is a good practice. Reasons, * preventing user upload a large file. It will slow down your website. * having a better control on your server storage. * knowing your web server capability.
All web servers have a default max file upload size. For example, Nginx’s default max upload size is 1MB and Apache’s is 2MB. PHP does have default max file upload size as well, it is 2MB.
You add a rule to allow the maximum 1MB photo to upload. In the max attribute, Laravel is measuring with the unit kilobytes. 1024 KB = 1MB
// app/Http/Requests/UploadPhotoRequest.php
public function rules()
{
    return [
        'photo' => 'required|image|max:1024'
    ];
}
Laravel performs the validation logic in sequence from the rules you’ve set. If the file size is matter more than the file type, you can rearrange the rule’s sequence to verify the file size first.
// app/Http/Requests/UploadPhotoRequest.php
public function rules()
{
    return [
        'photo' => 'required|max:1024|image'
    ];
}
MIME type
Rule image accepts all types of image, like JPEG, PNG, BMP, GIF, or SVG. However, GIF is not making any sense to be a profile picture or cover photo. Meanwhile, SVG is not a common file type to the normal user.
So, you add the MIME rule to accept JPEG or PNG only.
// app/Http/Requests/UploadPhotoRequest.php
public function rules()
{
    return [
        'photo' => 'required|max:1024|mimes:jpeg,png'
    ];
}
JPEG? What about JPG?
For the rules, JPEG includes JPG as well. If you want to learn more about the MIME types, you can refer to https://svn.apache.org/repos/asf/httpd/httpd/trunk/docs/conf/mime.types
Custom error message
Sometimes, the default error messages are not informative enough to tell the user what’s happening.
By overriding the messages method, you can set the custom error message for each rule.
// app/Http/Requests/UploadPhotoRequest.php
public function messages()
{
    return [
        'photo.required' => 'You haven\'t choose a photo.',
        'photo.max' => 'Your photo is too large, must be less than :max kb.',
        'photo.mimes' => 'We only accept :values.',
    ];
}
Alright, now you have a simple upload form and some rules to ensure user submit the right file.
What’s next
Next tutorial will be talking about uploading multiple files.
If you haven’t subscribed to my email list on the homepage, do it now. I’ll notify you when the new tutorial is published.
Did I tell you that you’ll receive a series of FREE tutorials when you subscribe? Go check it out.
Stay tuned.
Originally published at I Teach You How To Code.